Tuesday, July 31, 2012

Finding The Perfect Door Colour

Finding the perfect door colour could be a challenge.

I did not mind our old door colour, I thought that it was nice however my husband HATED IT!

He is colour blind, he can't see the "true" colours of red and green or any colours that have red or green in them and that had a huge impact on why he hated the front door.  To him every time he pulled up to the front of our house he was looking at a bright PINKish door...YUCK!

So I decided with our face-lift/make-over of the front yard the front door would get a fresh coat of paint, one that my husband could see and would LOVE.

We were looking for a colour that would complement the brick and the already painted garage doors but that did not blend in. We wanted a fresh, contrasting colour to welcome our guests and of course a colour that my husband was able to see and enjoy just like the rest of us.

These are the choices I came up with:


Paint Colour SW6251 Outerspace Sherwin Williams


 Paint Colour SW6689 Overjoy Sherwin Williams


So how did I make the decision?

I went to PicMonkey of course!

I took a photo of the front of the house, downloaded it onto PicMonkey and then I clicked on the sticker editor.  I chose the rectangle shaped sticker, arranged and placed it over the front door.  I then changed the colour as best I could to match my choice colours (shown above) and I faded it just a little so the door details would come through.  I did this for each colour, saved them and made a collage with my saved pictures.

Here is my finished product:

 Using PicMonkey really helped me see what the colour would actual look like when I fished painting.

and I have made my choice...

Monday, July 30, 2012

A Perfect Surprise


As I was painting the front door this afternoon I took a break, looked over and found a little white butterfly on our newly planted flowers.  Perfection!

Sunday, July 29, 2012

All The Pretty Flowers

Gardening is NOT one of my strong suits.  I begged my husband over and over to hire a trained/professional landscaper to come and work on this project.  However being such a small project and the limited amount of money we wanted to spend...I'm sure no landscaper would have touch this job.

So we got down and dirty in the garden...

How We Picked Our Flowers  

I started with my colour combination.  We had plenty of evergreen existing, actually too many we took one out.  I wanted a lot of colour but I was also trying to do something with the fire hydrant which is yellow and blue.  So...yellows with shades of blues and purples is the direction I wanted to go. However I did find one flower that did not fit into that scheme BUT I just had to have it.  We also had some pre-existing  flowers that to did not fit the colour combo that I went with but I think they all will add that little POP that a garden needs.

First thing I learned shopping for my flowers were there are A LOT of yellow flowers...blue not so much, that is why I needed to bring in the purple.  Second thing that we learned July is a great time to buy your flowers if you are trying to save money, all of our flowers were 40-50 % off...Great Deals!

Down and Dirty Tips

The information that comes on the tag of the flower is SOOO important when purchasing your flowers.  We wanted to make sure that we had all different shapes and heights within our flower beds and the info on the tags really helped us out with this.  You purchase these sweet little flowers however some of these "little flowers" grow into huge flowering bushes, you want to make sure you have room for them when they have matured.  Also very important, know the exposure tolerance for the flowers/plants.  There is no point wasting your money and time just to plant a flower in the full blown sun when it's exposure is part sun...NO MATTER HOW NICE IT LOOKS! We learned this the hard way!  We had to make a couple adjustment with our layout after we finished planting because a few of our flowers were not doing very well as they were in the wrong sun exposure.


Our Flowers
#1. 3 Yellow Daylilys
#2. 2 Moonbeam Coreopsis
#3. 3 Blue Clips Bellflowers
#4. 2 Jack Frost Brunnera
#5. 2 Lime Rickey Coral Bells
#6. 1 Ajuga tenorii (chocolate chip) Begleweed
#7. 1 Dwarf Bearded Iris
#8. 2 Blue Ice Blue Star
#9. 1 Hybrid Cowslip Primrose
#10. 1 Rhododendron
#11. 1 Cushion Spurge
#12. 1 Russian Sage
#13. 1 Goldwell Creeping Speedwell
#14. 1 Lavandula Stoechas (Boysenberry Ruffles)

Other Front Yard pictures and blog post  A Face Lift For The Front Yard

We purchased our flowers from Cedarhurst Landscaping LTD  and Zehrs Gardening Center.

Thursday, July 19, 2012

A Face Lift For The Front


The very first thing people see pulling up to your house is obviously the front yard.  I think it may be one of the most over looked areas of a home.  Our front yard needed a face lift.  It had good "bones" and great potential to look beautiful but first it just needed a little nip & tuck. Our Goal: To make the front yard look Fresh & Clean with a splash of colour and some creative features without spending a lot of money.

  
The Problem Areas: 1. The garden beds needed a little work 2. There was a tiny tree in the middle of the yard 3. The lawn was full of weeds 4. The pond 5. The fire hydrant Our Solutions:  #1 Remove the lawn (A.K.A weeds)
 The Sod Cutter is a great tool for getting the old lawn out.  It makes a cut from one side of the lawn to the other and all you need to do is roll the strips up and carry them away. We rented this one for $54 for the day but watch out because that thing ViBrAtEs like crazy.


#2.  Re-define The Flower Beds.  We wanted the flower beds to continue from the top to the bottom of the yard all the way along the drive way.  So after we removed the old lawn, smoothed and leveled 2 yards of top soil ($40 pickup) we added new edging to the area for the new flower beds.  We saved a lot of money as well as work hours by connecting the 2 existing flower beds to create one long continues bed that flows nicely from the top to the bottom of the yard.

#3.  Clearing Out The Existing Flower Beds  Once step #2 was complete.  We began removing the old decorative stone which filled the 2 existing flower beds.  We recycled the old decorative stone and filled in the side of the house which soon with be filled with some plants.

#4. New Mulch & Beach Stone  We decided to go with black mulch and beach stone to fill the beds in the front yard.

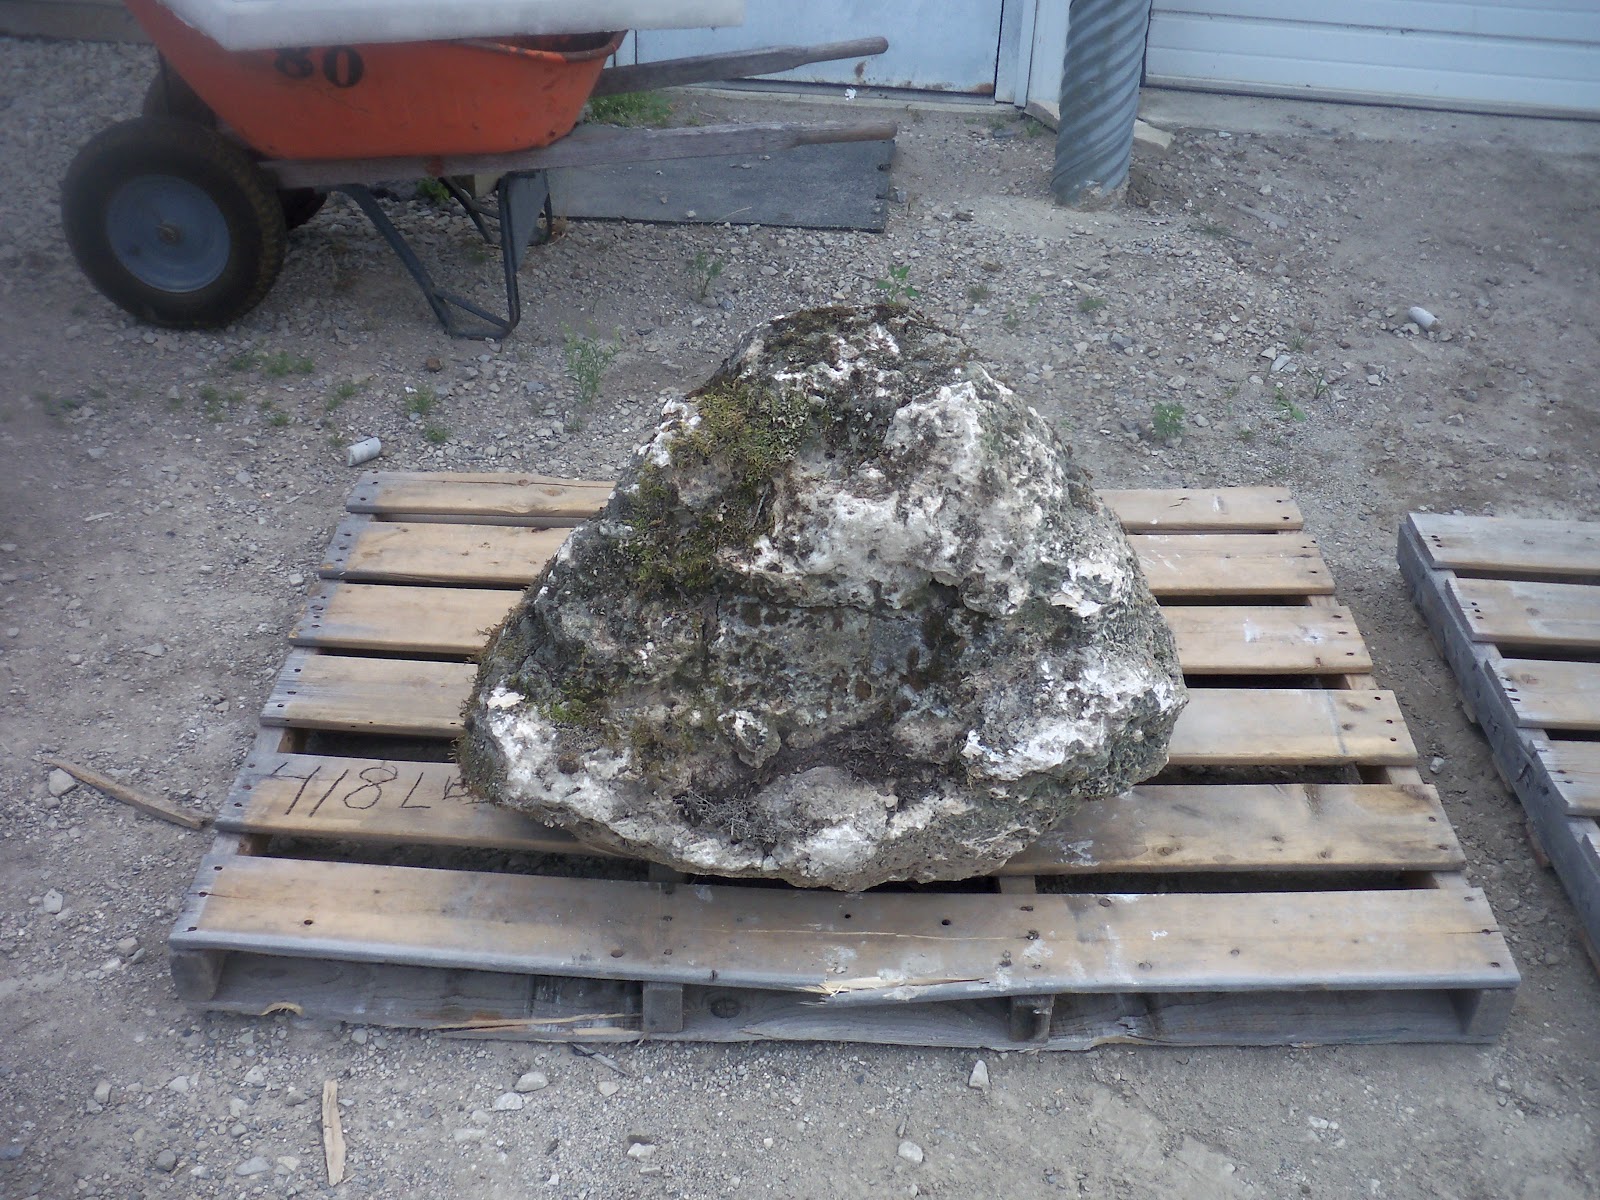
Like I said before the front yard had some great features that we were able to reuse.  The stones you see in this picture, we were able to incorporate them back into the new landscape design.  We also made many design choices around the mature plants (mainly evergreens) that had been previously planted. This again allowed us to same a lot of money as well as time.   


#5. Moving The Tree In The Middle Of The Yard This poor little tree just looked so pathetic sitting all alone in the middle of the yard.  As soon as we decided to give the yard a face lift this tree was first on our list of things we wanted to change.
We placed the lonely tree in our newly made flower bed.  This however was not the first choice.  Upon digging a hole for the tree in our first choice we realized that there was a layer of what seemed to be concrete only a few digs beneath the soil. So we went looking for an alternative spot.  Using a push broom for a visual we found a new spot and again we hit concrete.  It's final resting spot was choice #3 but I think that it worked out just fine. 
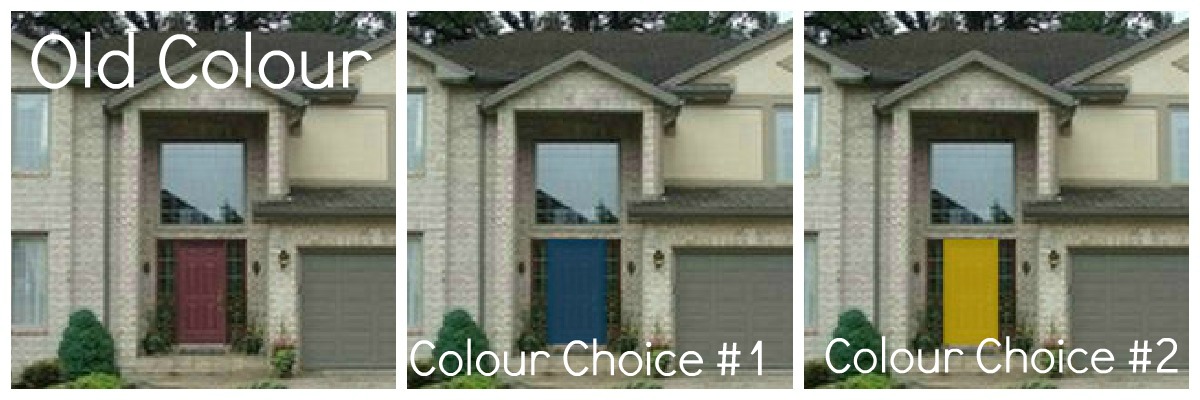
#6 Flowers For the Hydrant .  Although we had many preexisting evergreens we were lacking some colour and the blue and yellow painted fire hydrant was still an issue for me.  My first thought was to find some plant/flowers/bushes to cover up/hide the hydrant but then I thought maybe we could blend with the hydrant.  So we went shopping for some blue and yellow colour.  What a great time to shop for plants. All of our plants and flowers were 40%-50% off.  We saved a lot of money and were able to pick up some great plants and flowers for a great price.
When planting flowers and plants I like to lay it out, placing the flowers and plants around where they will be planted. It is much easier to move flowers/plants around when they are not in the ground.  Another great tip, read the information that is given about the type of flower/plant that you are planting. It is very important to check the size your plants/flowers will grow to as it matures.  Also you want to make sure you know the amount of sun or shade your flowers need.

Finally things are starting to come together.  I love the contrast of the Beach Stone and the black mulch.

#7 New Sod. There is nothing better then adding a nice green thick lawn to spruce up your front yard.

And we are almost there...a few more surprises and our front yard face lift will be complete.


Our Next BIG Project For The Front Yard
our stone

Sunday, July 15, 2012

Let The Fun Begin With A Blue & White Bedroom

It's been a while but we are finally on our way to making this house our home.  It was a paint sale at Rona that got us rolling on project #1.

Subject: Kylie
Age: 8
Favorite Colour: Blue
Location: Her Bedroom

We started with a paint colour, when decorating a bedroom I usually like to start with the bedding.  It is much easier to match paint colour to bedding then to match bedding to a paint colour.  However like I said there was a sale at Rona and we just HAD to buy :) SO, PAINT COLOUR FIRST IT WAS.

PAINT COLOUR:

image from myperfectcolour
SICO Paint: NORTHER WASH, egg shell finish.  Sherwin Williams colour. 


The Before:
Plain walls.

Old owners window treatments and odds & ends from the move.

No personality to the space at all.


We decided to keep all furniture the same...an unfortunate budget necessity.  With a good scrub and a Magic Eraser Kylie's bed, dresser and desk looked as good as new...almost!

Let The Painting Begin:
Using painters tape on my side of the room to tape off ceiling.

I prefer to tape off the ceiling to get a crisp clean line on top but I like to cut in by hand along the baseboards.  My husband on the other hand hates using painters tape.  So half the room I taped the ceiling and the other half was done without (just cutting in by hand) and actually I don't see any difference at all, mind you both sides have their tiny mistakes but that is painting...in our house anyways!

One wall down!

Once the walls were complete and the furniture arrangement agreed upon it was time to dress up the space.  We spent a whole afternoon shopping for wall decor or the "BLING".  I prefer to do all my decor shopping at once, of course if possible.  This way I'm able to compare colours and finishes so to get the perfect look.  It also helps me stay on budget.  If I can see everything that I have bought for that room all at once I'm less likely to buy that one...or ten extra little somethings .  There is nothing worse then finding a piece you LOVE only to return it because of a colour difference or because there is just NO ROOM for it.  If you are unable to shop all at once my helpful tip is to take a picture of all the other "bling" that you have purchased for that room on your phone so your able to take a quick peek while shopping making comparing and staying on budget a little easier.

We had the wall colour, we had the furniture the very next item on my list was bedding.  We looked for a good 2 hours driving from store to store with no luck.  I find bedding helps to give me direction when decorating a bedroom, without out it I was lost.  The only thought in my head was until we find bedding Blue & White will be our theme.

We gave up on the hunt and began our search for the BLING.

THE ROOM BLING:

Navy Blue shelves $26.99 and a mini Hourglass $2.99 from Bouclair.  Kylie made the Kitty Bank and Canada art/change purse was purchased on a vacation.

Floating Flowers $24.00 from Home Outfitters. Kitty Poster...A MUST HAVE demand from Kylie previously purchased at a book fair and promised to be added to her room once we decorated.  This promise I was sure she had forgotten...not my Kylie! 

Blue & White Clock $14.99 and White Bodice decor accessory (below) $16.99 from HomeSense 


Desk Chair $40.00 from BMR Le Groupe

We painted previously owned shelves white $0 and decorated with some of Kylie's art work and other things I found around the house $0.  


A small flat screen t.v. that hung in our previous kitchen $0, a lamp bought in Thailand from her uncle $?, a floating shelf $8.49 from BMR Le Groupe and previously owned D.V.D player $0.

Desk Lamp $15.97 from Zellers
 
4 hours of shopping, kids calling "when are you coming home?" and a budget shrinking by the minute and FINALLY we found it, the bedding from Zellers. It was our last hope and it was where we found this great desk lamp (see above picture)

BEDDING:

A prefect dark jean duvet set with pillow sham.  You can't see it in this picture but the duvet cover has a simple yet prefect framed detail boarder making it's way around the bed.

Duvet set with pillow sham $47.99 light blue sheet set $27.97 from Zellers.  Little white side table $24.00 from Winners.


(BTW I'm still on the hunt for some great CHEAP decorative pillows to dress the bed...keeping my eye out.)

 FINISHED PRODUCT:

I added a little heart sticker to the front of the desk as per Kylie's request.
Wicker chair (previously owned) was added as an after thought but it gives her a little place to sit and read


We had a little fun with Kylie and would not let her in the room until everything was done.  She knew the wall colour, she knew the furniture BUT she was shocked and LOVED everything that we did.


Related Posts Plugin for WordPress, Blogger...